CNN 이란?
2025. 2. 1. 18:58ㆍAI/딥러닝
1. CNN이란?
Convolutional Neural Network(CNN, 합성곱 신경망)는 이미지나 영상 데이터를 처리하는 데 특화된 인공 신경망입니다. 일반적인 신경망과 달리 이미지의 공간적 구조를 유지하면서 특징을 추출하기 때문에, 이미지 분류, 객체 탐지, 얼굴 인식 등에서 뛰어난 성능을 발휘합니다.
✅ CNN의 주요 계층
CNN은 5가지 주요 계층(layer)으로 구성됩니다:
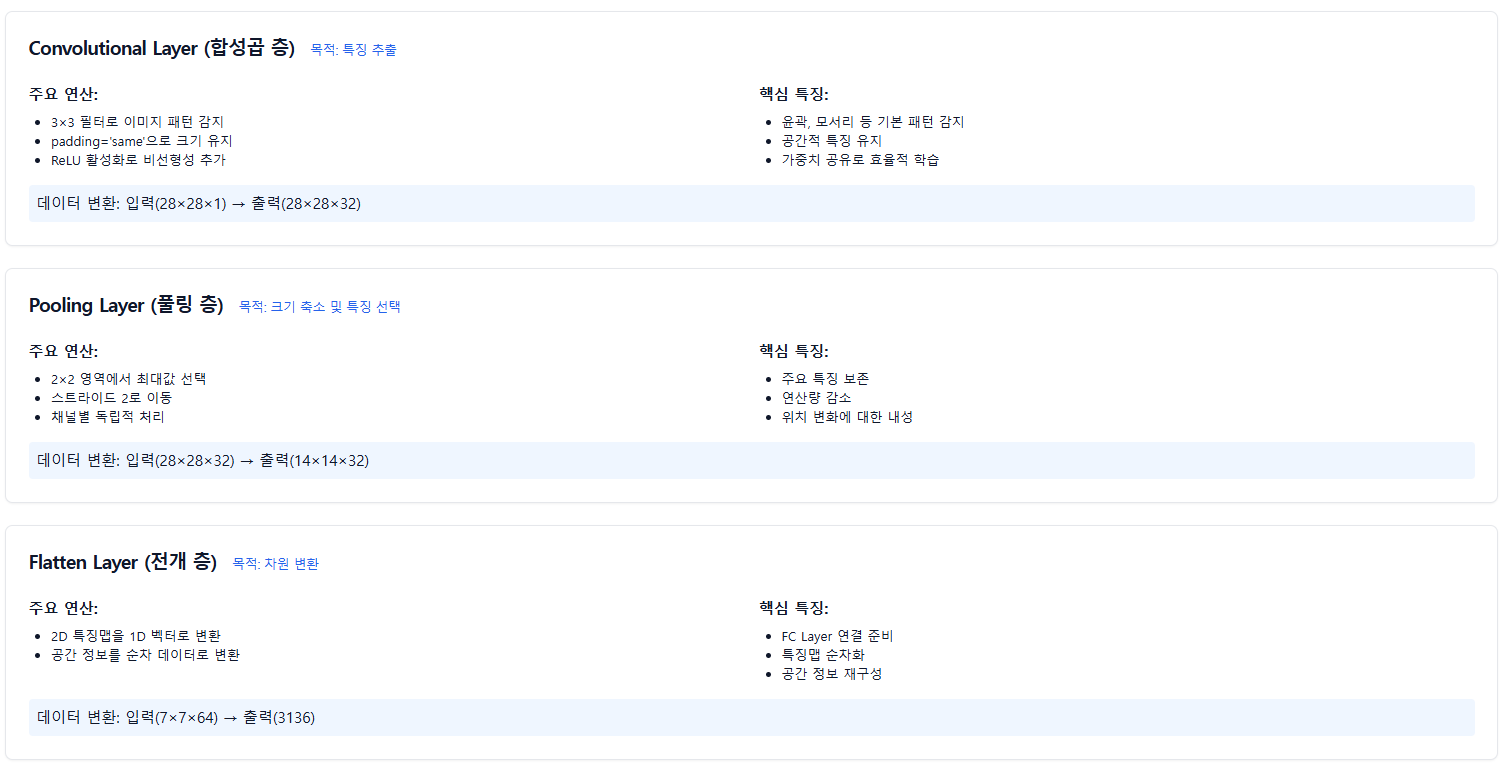
- Convolutional Layer (합성곱 층) - (https://gangdonggil.tistory.com/173)
- 이미지의 특징을 추출하는 역할
- 필터(커널)를 사용해 특징 맵 생성
- 입력 이미지에서 윤곽, 모서리 등의 패턴 감지
- 비선형 활성화 함수(ReLU) 사용하여 특징을 강조
- Pooling Layer (풀링 층) - (https://gangdonggil.tistory.com/174)
- 중요한 특징만 남기고 크기를 줄이는 역할
- 연산량 감소 및 모델의 일반화 성능 향상
- 대표적인 방법: 최대 풀링(Max Pooling)
- Flatten Layer (전개 층) - (https://gangdonggil.tistory.com/175)
- 2D 특징맵을 1D 벡터로 변환하여 Fully Connected Layer에 전달
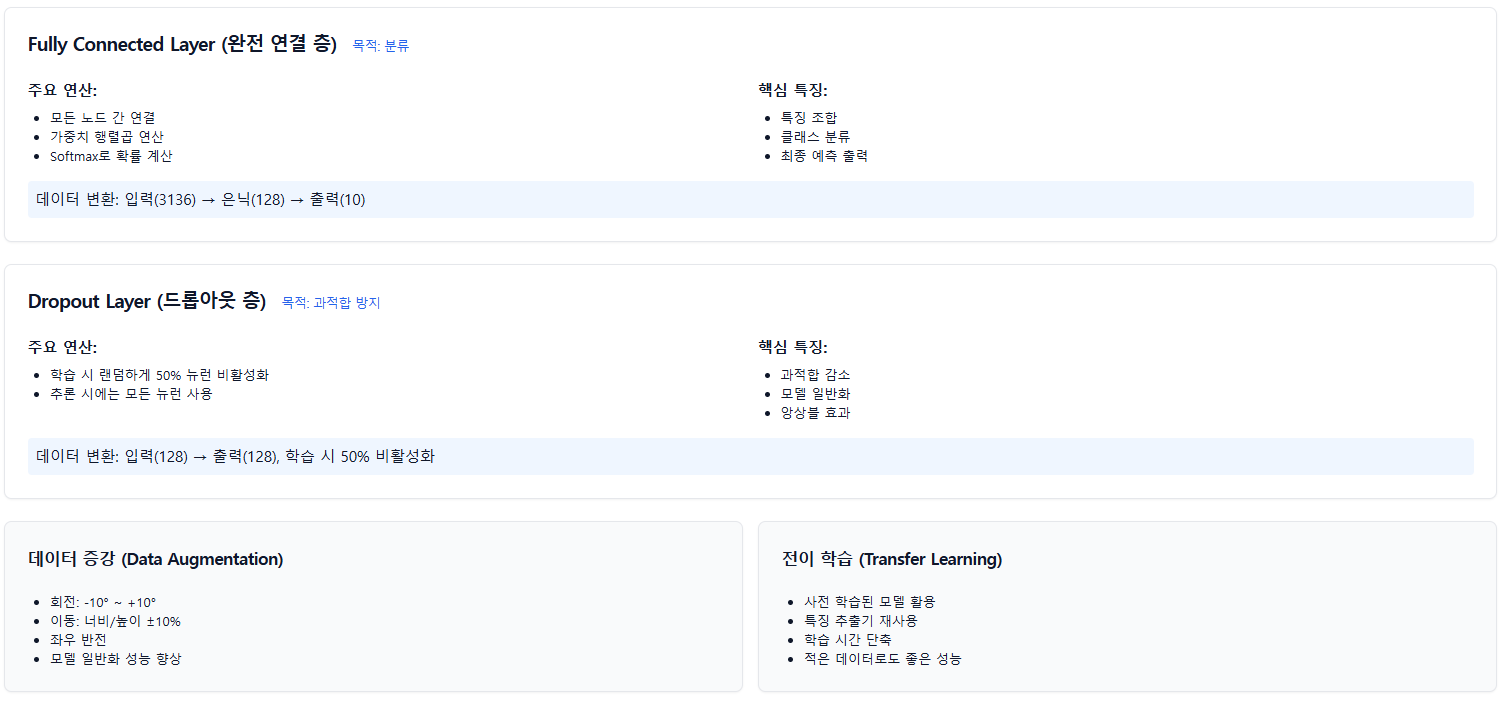
- Fully Connected Layer (완전 연결 층, FC Layer) - (https://gangdonggil.tistory.com/233)
- 추출된 특징을 기반으로 최종 분류 수행
- 마지막 층에서 소프트맥스(Softmax) 함수를 사용해 확률 분포 계산
- Dropout Layer (드롭아웃 층) - (https://gangdonggil.tistory.com/234)
- 학습 중 랜덤하게 일부 뉴런을 비활성화하여 과적합 방지
✅ 데이터 변환 과정
입력(28x28x1) → Conv2D(28x28x32) → MaxPool(14x14x32)
→ Conv2D(14x14x64) → MaxPool(7x7x64)
→ Flatten(3136) → Dense(128) → Dropout(0.5) → Output(10)

2. CNN의 상세 동작 방식
🔹 각 층의 역할
- 합성곱 층(Convolutional Layer): 작은 필터를 사용하여 이미지에서 패턴을 찾고, 낮은 수준의 특징(예: 선, 모서리 등)을 감지합니다.
- 활성화 함수(ReLU, Rectified Linear Unit): 비선형성을 추가하여 모델이 복잡한 패턴을 학습할 수 있도록 합니다.
- 풀링 층(Pooling Layer): 특징 맵의 크기를 줄이고, 중요한 정보만 남기면서 계산량을 감소시킵니다.
- 완전 연결 층(Fully Connected Layer): 추출된 특징을 기반으로 최종적으로 분류를 수행합니다.
- 드롭아웃 층(Dropout Layer): 일부 뉴런을 비활성화하여 과적합 방지
🔹 데이터 증강 (Data Augmentation) 적용
데이터 증강은 학습 데이터의 다양성을 증가시켜 모델의 일반화 성능을 향상시키는 방법입니다. 예를 들어:
from tensorflow.keras.preprocessing.image import ImageDataGenerator

datagen = ImageDataGenerator(
    rotation_range=10,
    width_shift_range=0.1,
    height_shift_range=0.1,
    horizontal_flip=True
)
학습 과정에서 데이터 증강을 적용하려면 model.fit()에서 datagen.flow()를 사용합니다.
model.fit(datagen.flow(x_train, y_train, batch_size=32), epochs=10, validation_data=(x_test, y_test))
🔹 학습 과정 시각화
import matplotlib.pyplot as plt

def plot_training_history(history):
    plt.figure(figsize=(12, 4))

    # 정확도 그래프
    plt.subplot(1, 2, 1)
    plt.plot(history.history['accuracy'], label='Train Accuracy')
    plt.plot(history.history['val_accuracy'], label='Validation Accuracy')
    plt.xlabel('Epoch')
    plt.ylabel('Accuracy')
    plt.legend()
    plt.title('Model Accuracy')

    # 손실 그래프
    plt.subplot(1, 2, 2)
    plt.plot(history.history['loss'], label='Train Loss')
    plt.plot(history.history['val_loss'], label='Validation Loss')
    plt.xlabel('Epoch')
    plt.ylabel('Loss')
    plt.legend()
    plt.title('Model Loss')

    plt.show()
🔹 예측 결과 시각화
import numpy as np

def plot_predictions(model, x_test, y_test, num_images=5):
    predictions = model.predict(x_test[:num_images])
    plt.figure(figsize=(10, 3))

    for i in range(num_images):
        plt.subplot(1, num_images, i + 1)
        plt.imshow(x_test[i].reshape(28, 28), cmap='gray')
        plt.title(f'Pred: {np.argmax(predictions[i])}\nTrue: {y_test[i]}')
        plt.axis('off')

    plt.show()
🔹 전이 학습 (Transfer Learning) 적용
사전 학습된 모델을 사용하여 학습 시간을 단축하고 성능을 향상시킬 수 있습니다.
from tensorflow.keras.applications import VGG16
from tensorflow.keras.models import Model
from tensorflow.keras.layers import Dense, Flatten

base_model = VGG16(weights='imagenet', include_top=False, input_shape=(224, 224, 3))
base_model.trainable = False  # 기존 가중치를 고정

x = Flatten()(base_model.output)
x = Dense(128, activation='relu')(x)
x = Dense(10, activation='softmax')(x)

model = Model(inputs=base_model.input, outputs=x)
model.compile(optimizer='adam', loss='sparse_categorical_crossentropy', metrics=['accuracy'])
3. CNN을 활용한 MNIST 숫자 분류 (예제 코드)
✅ 1단계: 데이터 전처리
import tensorflow as tf
from tensorflow import keras
import numpy as np
import matplotlib.pyplot as plt

# 데이터 로드 및 전처리 함수
def load_and_preprocess_data():
    mnist = keras.datasets.mnist
    (x_train, y_train), (x_test, y_test) = mnist.load_data()

    x_train, x_test = x_train / 255.0, x_test / 255.0
    x_train = x_train.reshape(-1, 28, 28, 1)
    x_test = x_test.reshape(-1, 28, 28, 1)

    return (x_train, y_train), (x_test, y_test)
✅ 2단계: CNN 모델 구성
# CNN 모델 정의
def build_cnn_model():
    model = keras.Sequential([
        keras.layers.Conv2D(32, (3,3), activation='relu', input_shape=(28, 28, 1), padding='same'),
        keras.layers.MaxPooling2D((2,2)),
        keras.layers.Conv2D(64, (3,3), activation='relu', padding='same'),
        keras.layers.MaxPooling2D((2,2)),
        keras.layers.Flatten(),
        keras.layers.Dense(128, activation='relu'),
        keras.layers.Dropout(0.5),
        keras.layers.Dense(10, activation='softmax')
    ])

    model.compile(optimizer='adam', loss='sparse_categorical_crossentropy', metrics=['accuracy'])
    model.summary()
    return model
✅ 3단계: 모델 학습 및 평가
# 학습 및 평가 함수
def train_and_evaluate():
    (x_train, y_train), (x_test, y_test) = load_and_preprocess_data()
    model = build_cnn_model()
    history = model.fit(x_train, y_train, epochs=10, validation_split=0.2)
    test_loss, test_acc = model.evaluate(x_test, y_test)
    print(f'테스트 정확도: {test_acc:.4f}')

    # 모델 저장
    model.save("cnn_mnist_model.h5")

    return history, model, x_test, y_test
✅ 4단계: 실행
train_and_evaluate()

# 모델 로드 및 평가
from tensorflow.keras.models import load_model
model = load_model("cnn_mnist_model.h5")
test_loss, test_acc = model.evaluate(x_test, y_test)
print(f'로드된 모델 테스트 정확도: {test_acc:.4f}')

# 학습 과정 시각화
plot_training_history(history)

# 예측 결과 시각화
plot_predictions(model, x_test, y_test)
이 문서는 다음 자료를 참고하여 작성되었습니다:
- Ian Goodfellow, Yoshua Bengio, Aaron Courville, Deep Learning, MIT Press, 2016.
- CNN의 기본 개념 및 합성곱 신경망의 동작 방식
- Andrew Ng, Machine Learning Yearning, deeplearning.ai.
- CNN과 데이터 증강(데이터 일반화)의 중요성
- François Chollet, Deep Learning with Python, Manning Publications, 2017.
- TensorFlow/Keras 기반 CNN 모델 구현
- TensorFlow 공식 문서 (https://www.tensorflow.org/api_docs)
- Keras를 사용한 CNN 모델 구성, 데이터 증강, 전이 학습 관련 코드
- PyTorch 공식 문서 (https://pytorch.org/docs/stable/index.html)
- CNN의 기본 개념과 PyTorch로 구현하는 예제
'AI > 딥러닝' 카테고리의 다른 글
| CNN의 주요 계층 - 전개 층(Flatten Layer) (0) | 2025.02.03 |
|---|---|
| CNN의 주요 계층 - CNN 풀링 층(Pooling Layer) (0) | 2025.02.03 |
| CNN의 주요 계층 - Convolutional Layer (합성곱 층) 정리 (0) | 2025.02.01 |
| 딥러닝 용어사전 사이트 (0) | 2024.07.23 |
| 딥러닝 기술을 사용한 컴퓨터 비전 (0) | 2024.07.06 |